Your cart is currently empty!
Germinating Seeds Indoors Using an Instapot with No Yogurt Setting
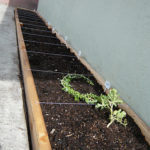
Disappointing update: germinating seeds indoors using the InstaPot with no yogurt setting was not a success for me. Days later, the bell pepper babies pictured here were still the only sprouts that appeared. Still, the instructions stay here for you to see what didn’t work and maybe try another way. I’d love to hear if you do get this method to work for you without a yogurt button!
I’m feeling like a big ol’ nerd with how excited I am over germinating seeds indoors this morning! Like, the excitement is huge. Huge enough to blog about it.
That’s like super OG nerd status, you guys.
So y’all know I’m on the marathon of my gardening life with learning how to successfully garden in the South. We moved to Georgia in 2012 from Long Beach, California. That last garden we had in SoCal… we literally just threw seeds in the ground; later that summer we were canning for DAYS.
Fast forward to my gardening here in Georgia…. and a dozen years later I’m STILL trying to reproduce that success lol. Between the heat, humidity, bug situation, seed germination indoors, and all that, it’s just way trickier here. But I learn a little each season, and it gets better and better, and there are some successes I can brag about!
My strawberry patch survived the winter, and we’re on that magical third year of our asparagus patch where we’ll finally get to eat em. There’s apple trees and a peach tree that might produce this year, there’s sage for days, and with any luck my wildflower patch by the driveway will have some self seeded return varieties when it gets warm.
Each season I try to add a new technique to my gardening practice to see if I can get closer to a bunch of homegrown produce, and this year I wanted to try seed germinating indoors with an InstaPot. Have you heard about this? It’s supposed to take that week, week and a half of getting seeds to start and make it happen in 1-2 days. ONE TO TWO DAYS, PEOPLE.
One of my big things this year is to start germinating seeds indoors sooner, at the end of January instead of end of February. I wanted to spend more time growing big strong plants that’ll survive better when it’s time to get planted in our garden beds. But then, life. Kids. Sickness. Work. And it became the beginning of February… and that clock is ticking, dudes.
So yesterday I spent 2 hours before church on setting things up for germinating seeds indoors using an InstaPot. But as I was getting close to time to walk out the door… I ran into a little problem.
MY INSTAPOT DOESN’T HAVE A YOGURT SETTING.
That’s like, the key setting I was seeing to use in the InstaPot seed starting directions I was finding online. That yogurt setting is key because it’s the lowest heat setting, at about 90°. If your seeds get too much hotter, they’ll end up cooking! So I was kind of freaking out in a “I just spent 2 hours setting this up and now I have to leave but I need to make this go… and I’m not sure it’s even going to work now… ” sort of way.
I did a couple of things, hit a go button, and said a little prayer for my garden babies.
And…

SUCCESS!!! I wanted to jump on here and record what I did to hopefully help others that end up not having a yogurt button on their Instant Pot, so here you go!
Germinating Seeds Indoors Using an InstaPot with No Yogurt Setting
You’ll need
- Quart-sized ziploc bags
- Paper towels – the tear a smaller sheet rolls are great for this
- Seeds of your choice
- Sharpie
- Big bowl of water
- InstaPot or other electric pressure cooker
- 1.5 c of water
Instructions
- Draw a line down the middle of a ziploc bag from the opening to the bottom. Label each half with which seeds are going in that area. You can do two seed varieties per bag this way.
- Tear a half-size sheet of paper towel off and dip it into the bowl of water. Squeeze it out a little so it’s still wet, but not dripping. Put the paper towel, folded in half, inside the ziploc bag.
- Put a few seeds on the paper towel, being careful to keep the two types of seeds on their halves of the paper.
- Close the bag.
- Do this for all of your seed starting needs – they can stack on top of each other in the InstaPot.
- Plug in the InstaPot, and pour 1.5 cups of water into the insert. Put the rack into the pot. I’ve got a different rack that’s a little more raised up (like 3-4 inches off the bottom), and that may have helped keep the seeds from getting too hot in the absence of the Yogurt button.
- Stack your ziploc bags on top of each other on the rack inside the InstaPot. Lay a kitchen towel across the top, and do not put a lid on. Because we’re using a slightly hotter temperature setting, we want some of that excess heat to escape.
- Hit the Keep Warm button on the InstaPot and go about your business. You’ll need to re-start the InstaPot every 10 hours, and you can check your seeds out that way.
- You should start seeing seeds germinating in a day or two, instead of 10 days! I’ve got all my spring seeds that do better starting as seedlings in the InstaPot, and I’m really excited to see how this works out.
Have you tried doing this for your spring seeds? I’d love to hear how it worked out for you! You can leave a comment or reach out to me here.


Freelance illustrator Steph Calvert is an award-winning artist with 24 years of experience working as a creative professional. She is based in McDonough, Georgia, just south of Atlanta.
Steph Calvert has expertise as a children’s book illustrator. She is an expert surface pattern designer for art licensing and creates line drawings for publishing and product design. Steph has years of additional expertise as a mural artist, creating original art, and logo design for small businesses. She is currently querying literary agents with her first author/illustrator book projects.
Writing CLIENTS INCLUDE
Moonfrye.com
OC Weekly
Educational Highlights
National SCBWI Conference, 2023
Illustration Summer Camp – The Highlights Foundation, 2021
Make Art That Sells, 2017
BFA in Computer Art – SCAD, 1999