Your cart is currently empty!
the voodoo that yudu so well – part 2: all the screens that’re fit to print! AND A GIVEAWAY!
now that we’ve covered how to burn screens with the yudu, i’m gonna share my experiences today in printing a big ol pile of shirts for an order i’m putting together for shopscad in savannah, georgia! there’s a lot of info to cover, but if you can hold on til the end i’ll tell ya about a fun giveaway we’re gonna do!
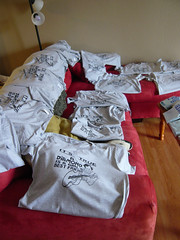
first up you start with a big ol pile of shirts and a few fabulously burned screens!


you’ll wanna iron your shirts before printing on em so there’s no weird wrinkles in the design, fyi be advised!

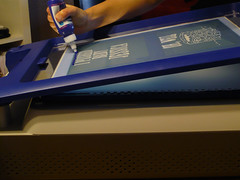
first of you’ll need to prepare the screen by taping off all the areas you don’t want ink to get through. i use ordinary 3m blue painters tape for masking off stuff because it’s not super sticky and comes off really clean when you need to take the tape off. also, notice that i burn more than one image onto a screen – thisll save you a ton of money in the long run – figure a yudu screen is 25 bucks – if you put 4 designs onto 2 screens you’ve effectively saved yourself 50 bucks! such a smart shopper! you can use vellum, plastic, acetate, or heavy paper to block off designs you don’t want to be part of your current printing. i use vellum. so if you wanna be awesome… uh… use vellum?

i would also totally recommend springing for yudu’s better squeegee. it just feels better with printing. i’m willing to bet if you already do screenprinting you’ve got a squeegee you like and i’ll be honest with you that crap will work. it won’t make the yudu blowup! so relax!
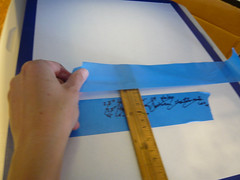
money saving tip: i think the yudu means well with their platens you can buy a bunch of and adhesive sheets, but for my one-color printing uses i find it kind of unnecessary. i left the protective sheet on top of the platen’s adhesive and i don’t put the platen inside the tee when i print. rather, i put a piece of cardboard inside the tee and set it on the platen and print away. here’s some info on lining up your images:

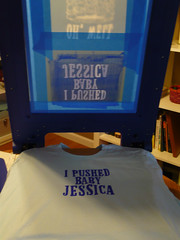
see that dark shape behind the “i pushed” text? i put a piece of tape on the platen to mark where the top of the artwork is.

then i jot down on the tape the measurement info on what points i want the tee to line up to to have proper placement. if you’re only doing one color stuff, the registration isn’t super important at all – if you’re planning on doing more than one color, definitely look into the yudu’s registration sheets and whatnot…
get your bead of ink across the top of the design and get to printin!

it’s a good idea to test print a couple of times on paper beforehand to make sure everything’s gonna go to plan…

money saving tip: you’ll need to put ink at the top of the design again with almost every pulling of the print – if you look at your squeegee you’ve probably got a lot of excess on there that you can scrape off with a popsicle stick and put across the top of the design instead of using another bead of ink from the bottle!
and POW! before you know it, you’re done printing your first tee!

and POW POW!!! before you know it, you’re done printing a whole mess of tees! one of the things i love about the yudu is it really really helps me production-time-wise. printing tons of shirts used to take forever, but i did 60 tees in 6 hours today! that includes printing, stamping a logo inside at the neck and heat setting each tee individually. you really can’t beat that!

i ran into a tiny problem with another screen of mine – the transparency was too high up on the emulsion when i exposed the screen, and part of the apostrophe got cut off!
no worries though, i busted out a tiny paintbrush and the yudu’s screen blocking stuff and fixed it right up! i will tell you i think i may try speedball brand’s screenblocking fluid in the future, because the yudu’s seemed to wash out when i cleaned the screen later…
if you have a larger tee design, it may be good to put a bead of ink across the top of the art, and then another bead of ink across the middle just in case!
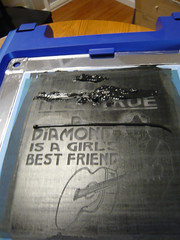
potential problem alert! ok i did find one thing with the yudu that was giving me some issues this morning. it seems like some screens don’t wanna stay on their pegs and they shift slightly. you don’t believe me? here’s proof!

it’s really not a huge deal for me because i do all one-color desigsn for now. BUT – i kept getting subtle double fingers from my neil diamond screen! maybe it’s too close to the edge of the emulsion? i dunno!

printing these neil diamond tees i can now tell you the 2oz bottle you receive with your yudu machine will be enough for about 16 large graphics. if you’re using it for tiny graphics you’ll get more for the money…
but what would be even better for the money is using a different brand of screenprinting inks… i kept reading everywhere that you are really only supposed to use yudu brand inks with this system. but they’re so flipping expensive! i started thinking about how i’ve always used speedball fabric screenprinting inks, and how they’re water soluabe just like the yudu inks… and then this happened:

and i felt like i should probably give it a try and report back!

and survey says DING DING DING! the tees i did with speedball ink turned out just as good AND rinsed out of the screen just fine at the end! hooray!
ok so if you’re using more than one design on a screen, how do you line up the bottom image when you wanna print it?

i do the same thing as with the top graphic – i put a piece of tape to mark the top of the artwork –
and then i measure out where i want the shirt to line up in comparison with that top of the artwork. make sure this piece of tape is long enough so you can se it on the side of your tee when you’re placing it on top of the platen!

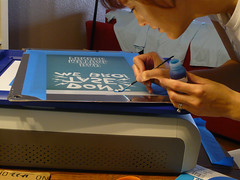
here’s my classic steph’s screenprinting pose! if you press your left arm down on the end of the screen and really lean into your print as you’re pulling the squeegee across you’ll get a nice amount of pressure and a crisp clear print. i like to pull my squeegee across twice so it’s nice and dark!
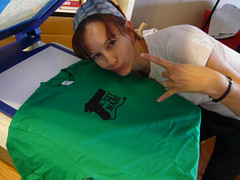
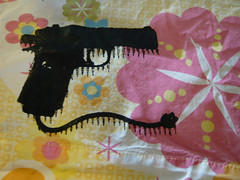
check it out! i effing love this glue gun design and i’ve been wanting to burn a screen of this for ages – if you like it make sure you read to the end of this novel-length post for info on an awesome giveaway!
once i did one of those glue gun tees, i wanted to print that graphic on EVERYTHING! i’m not one for texty tees so i put tape over the words on the back of the screen and slapped that design on one of my sweatshirts!

and then i went for the yoga mat!


but due to the texture of the mat and the thin quality of the speedball ink i used, the design came out really smudged on the yoga mat. i recommend on highly textured non-clothes stuff it may be better to use the yudu inks cuz they’re a lot thicker.

and all that smudging went up on the back of the screen, too – something i didn’t think about until i tried screenprinting a pillowcase with the glue gun design…
(i still kinda like it though!)
and THEN i put it on a tee using the yudu gold metallic ink! i don’t know if speedball has a shiny gold and silver fabric ink but if they don’t the yudu brand is totally worth it!

and THEN i made some of these notecards! i think they’d be fun invitations if you’re planning a crafty party night a your house – or if you’re in a craft mafia chapter (like me!) and you’re inviting new members to join they’d also be super cute!

and THEN i screenprinted my dog! i think it turned out pretty good, check it out:

and that about does it for my adventures with the yudu today! it’s time to talk CONTEST! first place gets the kelly green “get made” tshirt pictured in this blog post – i only have one available right now in an american apparel unisex size small, so if you don’t wear that size and you win you can maybe give it to a friend or bake it into a pie! second place gets a turquoise “get made” greeting card!
here’s how it works – this’ll be a random drawing, and there’s a few different ways to get chances to win, and you can participate in more than one of these to get extra chances:
1) comment about this blog post!
2) twitter a link to this blog post and send me the link as proof
3) post a link to this entry on your blog and send me a link as proof
4) write a haiku about screenprinting in the comments of this post
5) share a link to this blog post on facebook or myspace and send me a link as proof
you’ve got until friday may 15th at midnight so get cracking and have fun! winner will be chosen from random drawing and will be notified via email! GOOD LUCK!

Freelance illustrator Steph Calvert is an award-winning artist with 24 years of experience working as a creative professional. She is based in McDonough, Georgia, just south of Atlanta.
Steph Calvert has expertise as a children’s book illustrator. She is an expert surface pattern designer for art licensing and creates line drawings for publishing and product design. Steph has years of additional expertise as a mural artist, creating original art, and logo design for small businesses. She is currently querying literary agents with her first author/illustrator book projects.
Writing CLIENTS INCLUDE
Moonfrye.com
OC Weekly
Educational Highlights
National SCBWI Conference, 2023
Illustration Summer Camp – The Highlights Foundation, 2021
Make Art That Sells, 2017
BFA in Computer Art – SCAD, 1999
15 responses to “the voodoo that yudu so well – part 2: all the screens that’re fit to print! AND A GIVEAWAY!”
Either I’m first, or you *screen* your comments.
hahahaha
Great tutorial! I recently participated in my etsy team’s t-shirt making event, and it’s not as easy as it looks!
uwib rocks!
Lisa
haha. I love that you printed your doggie. 🙂 corysu @ gmail .com
HAHAHAH the look on Jimmy’s face!
ahahaha I hate to have to tell you guys that I didn’t really print jimmy… I don’t think josh woulda been to happy about it so I resorted to the powers of photoshop!
Thanks for the awesome tutorial! I got a Yudu last week and have been really anxious to play with it! I can’t wait to try it out.. I’m glad to hear that Speedball inks work well in it! So much cheaper.
Ha! Love the printed dog. Could you do that to my 90-pound hairy-reared collie?
I have a cheaper screenprint kit that I got for Christmas years ago and I have yet to try it. I just might now. Thanks for the inspiration!
http://twitter.com/loki_smoke I just posted a link to yer tutorial. looks like fun! yet another crafty endeavor that i want to play with.
wow. awesome tutorial. i’m bookmarking for when i have the dough to get one. here’s my haiku, yo:
squeeze ink have magic
happiness, is a warm gun
thanks, me wants a tee
I could never keep my hand steady enough to do screen printing. I’ll leave all that hard crafty stuff to the experts like you. 😉
I want a screen-printed doggie
AHAHAHA awesome comments guys, thanks! I do regret to inform you I didn’t actually screenprint my dog… I’m just really good at photoshop 🙂
That's pretty awesome work. I had a dream about screen printing crotchal regionatiels one time, but I never screen printed my dog. You win for that.
Everyone who is successful with the yudu seems to pretty much redesign, reconfigure, and ignore their instructions and recommendations.
I have a Screen Printing Walkthrough I'll send you for free if you'll review it for me. Find it at diyTeeShirts.com
I love your post thanks for sharing this, it is very helpful. My question is how long does it take for your tees to dry and how do you dry them? I’m trying to convince my DH this is a good investment (wink)
Hi there! It’s a good idea to let your printed tees air dry for 24 hours, and then heat set them. Heat setting helps the ink really adhere to the fabric, keeping your screenprinted art bolder for longer. You can use an iron set to the hottest setting the fabric you printed on can stand, or you can use a commercial heat sealer which will heat up much hotter than the iron will. (If your operation is pretty small and you’re mostly printing small batches of tees, you don’t really need the added expense of a heat sealer machine – just stick to your iron.)
Let me know if there’s any other questions I can answer for you!
this post step by step to stamp screen printing on T-shirts is amazing, I did not imagine it would be so easy to stamp an object following so many details, congratulations